- Looks at the strongest lines and the most common lines.
- Chess engine tested (mostly Stockfish and Rybka).
- Written for players who have an appreciation for the initiative.
Introduction and the Main Line
Players faced with King's Gambit will often play 2 ... d5 to try and throw White off his game by trying to put him in territory he is not used to. Accepting the gambit with 2 ... exf4 will leave White knowing exactly what he wants to do. But King's Gambit players should be prepared to deal with 2 ... d5 because a little preparation will go a long way in this opening since chances are your opponent did not spend time developing their own 2 ... d5 repertoire.This article ambitiously tries to present a repertoire for White. Familiarity and, maybe some (if not all) memorization of the lines that follow will allow you to have the winning edge against your opponent.

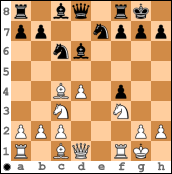
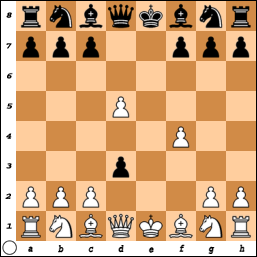
1. e4 e5 2. f4 d5
We have arrived at the starting position of the Falkbeer Counter-Gambit. Do not even think about playing fxe5 since it loses to the move Qh4+.
Although our repertoire consists of playing the move exd5 in this position, the move Nf3 is also a playable option. It might serve as a surprise weapon against lower rated players, but against higher rated players it will allow Black to transpose into familiar territory with moves like exf4.
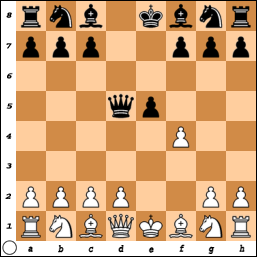
3. exd5 e4
The e-pawn is pushed to prevent White from developing his knight to the natural f3-square. Since White cannot capture the e4-pawn, he is, more or less, forced to spend time dealing with it.
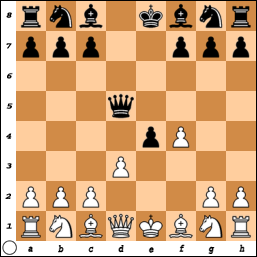
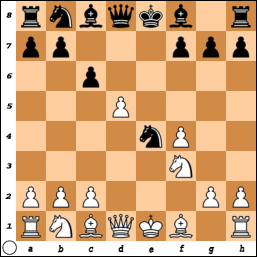
4. d3 Nf6
White threatens to take Black's e-pawn and thereby allow himself more space to develop more effectively and naturally. Taking the d3-pawn would only allow White to take back and develop a queen or bishop at the same time. Black's best bet instead is to defend with the knight.
5. dxe4 Nxe4
White takes care of the e4-pawn, but is now has to deal with the d4-knight being too close to the White king.
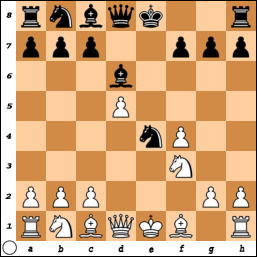
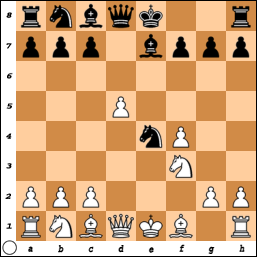
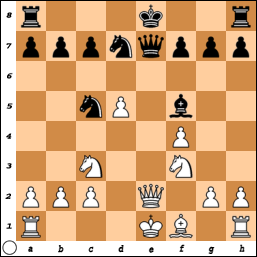
6. Nf3 Bc5
Nf3 is a commonly played early on in the Falkbeer Counter-Gambit. Black Bc5 looks scary because of the possibility of Bf2+, but this is not something White should worry about as we shall see below.
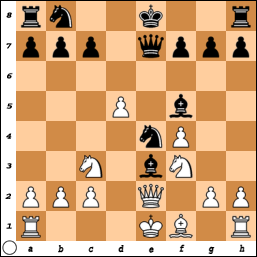
7. Qe2 Bf5
The queen pins the e4-knight and Black replies by defending it with the bishop. The main line ends after Black's 7th move. I have chosen two more moves that we will count as the main line for the purposes of this article.
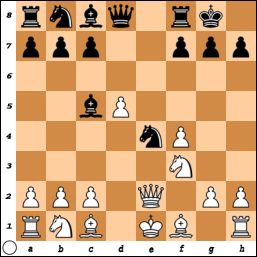
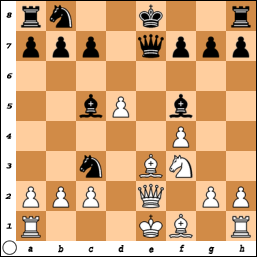
8. Nc3 Qe7
White attacks the pinned piece and Black removes the pin on the king.
9. Be3 Nd7
Developing the bishop opens the potential to castle queen-side while developing and attacking at the same time. I chose the move Nd7 as the best move in this position because it protects the bishop and develops at the same time.
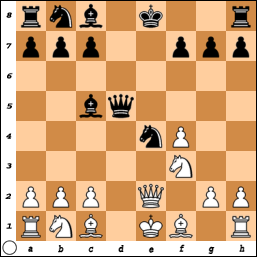
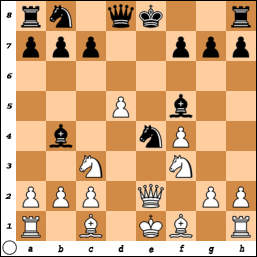
10. Bxc5 Ndxc5
And we reach the final position of our main line.
Chapter 1: Black's 3rd Move Alternatives
Section 1: 3 ... c6 is the Nimzowitsch Counter-Gambit and requires its own article. I will only do brief analysis of this opening here. Experience in this line is most important for dealing with it properly.
Section 2: 3 ... exf4 is the 2nd most popular reply and transposes into the Modern Variation of the King's Gambit Accepted.
Section 3: 3 ... Qxd5?! is the move I have seen played often in online chess. The problem is that it gives White a slight advantage after the move 4. Nc3 as we will see below. In practice it does even better since it wins for White 69% of the time in a database of 143 games.
Section 1: 3 ... c6 is the Nimzowitsch Counter-Gambit
I have seen this a couple of times in online blitz games.
White is left with a position of many options. That itself is one of the drawback of playing the Nimzowitsch Counter-Gambit for Black: Black needs to be prepared for many different lines. In analyzing this position, I have come to the conclusion that the best way to continue is 4. Nc3, with 4. Qe2 coming in as a close second. Grandmaster John Shaw has called 4. Qe2 a "greedy and clumsy" move: Although White gets to keep an extra pawn, Black gets play.
4. Nc3 has great practical results. Black has two choices: 4 ... cxd5?! and 4 ... exf4. After 4 ... cxd5?!, play will continue 5. fxe5 d4 6. Bb5+ Nc6 7. Ne4 Qd5 8. Qe2 Bf5 9. Bxc6+ bxc6 10. d3 Bxe4 11. Qxe4 Qxe4+ 12. dxe4. Here, White will have an extra pawn and even though the e-pawns are doubled, the e-pawns are easily defended (while it is difficult for Black to attack them). White is left with an advantage that he can convert into victory.
4 ... exf4 is the best continuation for Black. The main line consists of the following moves: 5. Nf3 Bd6 6. d4 Ne7 7. dxc6 Nbxc6 8. Bc4 0-0 9. 0-0.
The position offers both sides chances. As for king safety, Black's king is more safe since White only has the cover of two pawns. Thus, White should seek to trade the queens off the board and minimize the chance Black being successful in attacking the White king. But that is a look at the potential of the position. At the moment, White's king is just fine and there are no obvious ways for Black to attack it other than launching a pawn storm (which of course would weaken Black's own king).
A) 4 ... Qxd5 5. Nc3 and now the queen will move and White will develop a third piece compared to Black's one piece (the queen itself). The Black queen has many moves: Qe6+, Qd8, Qd7, Qh5, Qf5, Qd6 (not a complete list). If the Black queen checks, White should block and develop by playing Be2. With other queens, White should look to play d4. 5 ... Qh5 6. d4 (an interesting variation would be 6. Nb5 Na6) 6 ... Bd6 7. Nb5 Qh6 8. c4!? White could play 8. Nxd6 and have decent game after 8 ... Qxd6 9. Ne5. But c4 is an interesting move because it has ideas of gaining space, gaining a tempo, and restricting Black's dark-squared bishop. Black does not have effective ideas and might try 8 ... a6 but will find itself having to play c6 after White's Qa4 move. So White should just play 8 ... c6 the first time. 9. Nxd6+ Qxd6 and we see that Black's b8-knight will have to develop on d7 and when the pieces come off the board, White should be able to easily create a passed d-pawn. 10. Qd2 is a crude and simple looking plan that works. 10 ... Bf5 developing the bishop on the open diagonal. 11. Qxf4 Qxf4 12. Bxf4. White has a slight advantage due to a superior center, better development, and the bishop pair.
B) 4 ... Be7!? 5. Bb5+ (5. Nc3 would be interesting to analyze, but 5. Bb5+ is the move I would recommend). 5 ... c6 6. dxc6 Nc6 (Analysis of 6 ... bxc6 and 6 ... Bh4+ below). 7. Nc3 Bh4?!. Your opponent will be eager to play this move, but it is not as good as it looks for Black. 8. Kf1 Bg4 9. h3 Bh5 10. d4. In this position, Black has to play 10. Nge7 because of the threat of d5. 10 ... Nge7 11. Bxf4 Bxf3 12. Qxf3 and White will start to push that d-pawn. The position is slightly better for White due to that pawn. 12 ... Qxd4? loses to the following moves: 13. Rd1 Qb6 14. Be3 Qc7 15. Qe4 Bf6 16. Nd5 Qe5 17. Qxe5 Bxe5 18. Nxe7 Kxe7 19. Bc5+ and Black will be chased around the board. White's initiative, his bishop pair, and the open files soon to be used by the rooks will be decisive in favor of White: Clear advantage for White.
1) 6 ... bxc6 7. Bc4 Bh4+ 8. Kf1 Bf6 9. Nc3 Bxc3 10. bxc3 Qe7 11. Qe2 Qxe2+ 12. Kxe2 Nf6 13. Ba3. White has a clear advantage because of his developed position, active pieces (initiative!), bishop pair, Black's struggle to castle, and soon to be active White rooks.
2) 6 ... Bh4+ 7. Kf1 bxc6 8. Bc4 Bf6 and as we can see we have transposed into the above line 6 ... bxc6 line.
C) 4 ... Nf6 (Modern Variation) may be Black's best attempt and would require an article of its own. We take a brief look here. You will definitely see 4 ... Nf6 from higher rated players and/or prepared players. If Black is allowed, he will take the d4-pawn and defend his f4-pawn. Deciding which moves to play in this position is a journey because there are many different approaches. What are the candidate moves? Bb5+, Bc4, c4, d4, Nc3, Be2, and Nc3. Hungarian GM Richard Rapport has played 5. Be2 and that may be an interesting way of throwing Black off his prepared lines. Although 5. Bb5+ can be criticized for allowing Black a small lead in development, I believe it is the best approach. The game might continue with the following strong moves: 5 ... c6 6. dxc6 Nxc6 7. d4 Bd6 8. 0-0 0-0 9. Nbd2!?. Both sides will have chances in this variation.
White is left with a position of many options. That itself is one of the drawback of playing the Nimzowitsch Counter-Gambit for Black: Black needs to be prepared for many different lines. In analyzing this position, I have come to the conclusion that the best way to continue is 4. Nc3, with 4. Qe2 coming in as a close second. Grandmaster John Shaw has called 4. Qe2 a "greedy and clumsy" move: Although White gets to keep an extra pawn, Black gets play.
4. Nc3 has great practical results. Black has two choices: 4 ... cxd5?! and 4 ... exf4. After 4 ... cxd5?!, play will continue 5. fxe5 d4 6. Bb5+ Nc6 7. Ne4 Qd5 8. Qe2 Bf5 9. Bxc6+ bxc6 10. d3 Bxe4 11. Qxe4 Qxe4+ 12. dxe4. Here, White will have an extra pawn and even though the e-pawns are doubled, the e-pawns are easily defended (while it is difficult for Black to attack them). White is left with an advantage that he can convert into victory.
4 ... exf4 is the best continuation for Black. The main line consists of the following moves: 5. Nf3 Bd6 6. d4 Ne7 7. dxc6 Nbxc6 8. Bc4 0-0 9. 0-0.
The position offers both sides chances. As for king safety, Black's king is more safe since White only has the cover of two pawns. Thus, White should seek to trade the queens off the board and minimize the chance Black being successful in attacking the White king. But that is a look at the potential of the position. At the moment, White's king is just fine and there are no obvious ways for Black to attack it other than launching a pawn storm (which of course would weaken Black's own king).
Section 2: 3 ... exf4
4. Nf3 should be played and, as we will see, this is the common move we will see early on in many Falkbeer Counter-Gambit games. It is easy to see why. The queen check could cause White problems. After Nf3, Black is left with many playable moves. We take a look at three.
A) 4 ... Qxd5 5. Nc3 and now the queen will move and White will develop a third piece compared to Black's one piece (the queen itself). The Black queen has many moves: Qe6+, Qd8, Qd7, Qh5, Qf5, Qd6 (not a complete list). If the Black queen checks, White should block and develop by playing Be2. With other queens, White should look to play d4. 5 ... Qh5 6. d4 (an interesting variation would be 6. Nb5 Na6) 6 ... Bd6 7. Nb5 Qh6 8. c4!? White could play 8. Nxd6 and have decent game after 8 ... Qxd6 9. Ne5. But c4 is an interesting move because it has ideas of gaining space, gaining a tempo, and restricting Black's dark-squared bishop. Black does not have effective ideas and might try 8 ... a6 but will find itself having to play c6 after White's Qa4 move. So White should just play 8 ... c6 the first time. 9. Nxd6+ Qxd6 and we see that Black's b8-knight will have to develop on d7 and when the pieces come off the board, White should be able to easily create a passed d-pawn. 10. Qd2 is a crude and simple looking plan that works. 10 ... Bf5 developing the bishop on the open diagonal. 11. Qxf4 Qxf4 12. Bxf4. White has a slight advantage due to a superior center, better development, and the bishop pair.
B) 4 ... Be7!? 5. Bb5+ (5. Nc3 would be interesting to analyze, but 5. Bb5+ is the move I would recommend). 5 ... c6 6. dxc6 Nc6 (Analysis of 6 ... bxc6 and 6 ... Bh4+ below). 7. Nc3 Bh4?!. Your opponent will be eager to play this move, but it is not as good as it looks for Black. 8. Kf1 Bg4 9. h3 Bh5 10. d4. In this position, Black has to play 10. Nge7 because of the threat of d5. 10 ... Nge7 11. Bxf4 Bxf3 12. Qxf3 and White will start to push that d-pawn. The position is slightly better for White due to that pawn. 12 ... Qxd4? loses to the following moves: 13. Rd1 Qb6 14. Be3 Qc7 15. Qe4 Bf6 16. Nd5 Qe5 17. Qxe5 Bxe5 18. Nxe7 Kxe7 19. Bc5+ and Black will be chased around the board. White's initiative, his bishop pair, and the open files soon to be used by the rooks will be decisive in favor of White: Clear advantage for White.
1) 6 ... bxc6 7. Bc4 Bh4+ 8. Kf1 Bf6 9. Nc3 Bxc3 10. bxc3 Qe7 11. Qe2 Qxe2+ 12. Kxe2 Nf6 13. Ba3. White has a clear advantage because of his developed position, active pieces (initiative!), bishop pair, Black's struggle to castle, and soon to be active White rooks.
2) 6 ... Bh4+ 7. Kf1 bxc6 8. Bc4 Bf6 and as we can see we have transposed into the above line 6 ... bxc6 line.
C) 4 ... Nf6 (Modern Variation) may be Black's best attempt and would require an article of its own. We take a brief look here. You will definitely see 4 ... Nf6 from higher rated players and/or prepared players. If Black is allowed, he will take the d4-pawn and defend his f4-pawn. Deciding which moves to play in this position is a journey because there are many different approaches. What are the candidate moves? Bb5+, Bc4, c4, d4, Nc3, Be2, and Nc3. Hungarian GM Richard Rapport has played 5. Be2 and that may be an interesting way of throwing Black off his prepared lines. Although 5. Bb5+ can be criticized for allowing Black a small lead in development, I believe it is the best approach. The game might continue with the following strong moves: 5 ... c6 6. dxc6 Nxc6 7. d4 Bd6 8. 0-0 0-0 9. Nbd2!?. Both sides will have chances in this variation.
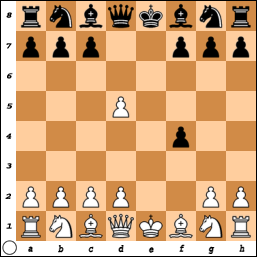
Section 3: 3 ... Qxd5?!
This move is an indication that your opponent is not fully prepared to play the Falkbeer Counter-Gambit. Does this mean that White wins? No! But White does get a decent advantage. The move that must be played to get this advantage is 4. Nc3. Black is left with many moves and here we cover a few of the most important ones.
A) 4 ... Qe6 5. fxe5 Qxe5 6. Be2 Nc6 7. Nf3 Qa5 8. 0-0. White will be looking to play d4 very soon and have a slight, but definitive, advantage due to his better development.
B) 4 ... Qa5 5. Nf3 exf4 6. d4 Bd6 7. Bd3 Nf6 8. 0-0 0-0 9. Nb5! Qb6 10. c4! White has a much better position because of threats of playing c5 (forking the queen and bishop) and piece activity. Black's bishop can be kicked away and White's rook and dark-squared bishop will come into the game.
C) 4 ... Qd6 5. Nf3 exf4 6. d4 Nf6 7. Bc4 Nc6 8. Qe2+ Qe7 9. Qxe7+ Bxe7 10. Nb5 Bd6 11. Nxd6+ cxd6 12. Bxf4. Here, material is even, but White has better development and pawn structure. Slight advantage to White.
5. g3 Qe7 6. Ne2 Bf5 7. Bg2 exd3 8. cxd3. White will not try too hard to defend that d5-pawn since he is already up a pawn. Clear advantage for White.
Chapter 3: Black's 5th Move Alternatives
A) 4 ... Qe6 5. fxe5 Qxe5 6. Be2 Nc6 7. Nf3 Qa5 8. 0-0. White will be looking to play d4 very soon and have a slight, but definitive, advantage due to his better development.
B) 4 ... Qa5 5. Nf3 exf4 6. d4 Bd6 7. Bd3 Nf6 8. 0-0 0-0 9. Nb5! Qb6 10. c4! White has a much better position because of threats of playing c5 (forking the queen and bishop) and piece activity. Black's bishop can be kicked away and White's rook and dark-squared bishop will come into the game.
C) 4 ... Qd6 5. Nf3 exf4 6. d4 Nf6 7. Bc4 Nc6 8. Qe2+ Qe7 9. Qxe7+ Bxe7 10. Nb5 Bd6 11. Nxd6+ cxd6 12. Bxf4. Here, material is even, but White has better development and pawn structure. Slight advantage to White.
Chapter 2: Black's 4th Move Alternatives
Section 1: 4 ... Qxd5 looks a little tricky because Black can pin the knight should White decide to play Nc3. But knowing exactly what to do will give White a slight edge in this line. Ultimately, White must decide between 5. Qe2 or 5. Nc3. It is a close call.
Section 2: 4 ... exd3 is a strange variation that happens to be fairly rare. Still, it is important to know how to deal with it. White has to decide between recapturing between the queen or the bishop. One allows for the d-pawn to be protected and the other allows for more natural development.
Section 3: 4 ... Qxh4+ is nothing scary.
Section 1: 4 ... Qxd5
5. Nc3 Bb4 6. Bd2 and now Black is forced to play Bxc3 because a queen move gives White a clear advantage. For example, 6 ... Qe6 7. dxe4 Bxc3 8. Bxc3 Qxe4+ 9. Qe2 Qxe2+ 10. Nxe2. 6 ... Bxc3 7. Bxc3 with the threat of taking on g7 and then taking the Black rook. 7 ... exd3 fails to 8. Bxg7 which follows a sharp variation that is very good for White. If White wants to avoid that, he can play 8. Bxd3 but the advantage is not as strong as the 8. Bxg7 line. The strongest continuation in our original line is 7 ... Nf6 8. Bxf6 (also effective is 8. dxe4). The following line is instructive and leads to a slight advantage to White: 8 ... gxf6 9. dxe4 Qxe4+ 10. Qe2 Qe6 11. g3 0-0 12. Qxe6 fxe6 13. 0-0-0 e5 14. Bg2 exf4 15. gxf4 with at least a slight advantage to White because of White's ability to develop quicker and more naturally.
Section 2: 4 ... exd3
5. Qxd3 Na6 6. a3. White's last move is multipurpose. Besides the idea of preventing the knight and bishop from coming onto the b4-square, White wants to be able to play defend the c2-pawn without having to play a move like Na3. Overall, it is about being able to play the natural Nc3 move. 6 ... Nf6 7. Nc3 Nc5 8. Qe2 Be7 9. Be3 0-0 10. Qc4 b6 11. 0-0-0 Ba6 12. Qa2 Bxf1 13. Rxf1 is probably the strongest continuation. Stockfish gives White a slight advantage.
Section 3: 4 ... Qxh4+
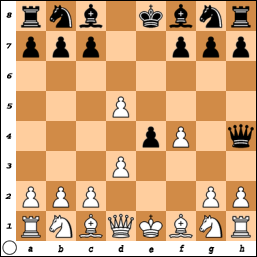
5. g3 Qe7 6. Ne2 Bf5 7. Bg2 exd3 8. cxd3. White will not try too hard to defend that d5-pawn since he is already up a pawn. Clear advantage for White.
Chapter 3: Black's 5th Move Alternatives
Section 1: 5 ... Bc5? is the only other move that is ever seen in this position. However, even 5 ... Bc5 is super rare. Thus, this will be a short chapter.
Chapter 4: Black's 6th Move Alternatives
Section 2: 7 ... 0-0?
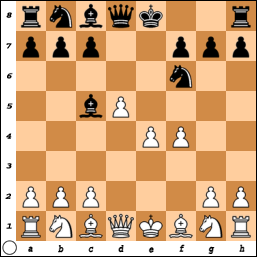
Section 1: 5 ... Bc5?
6. Nc3 c6 7. Nf3 0-0 8. dxc6 Qe7 9. e5 Nxc6 10. Qe2 is one of many possible lines. The point is that White is up two pawns. The plan is simple: trade and maintain king safety. An endgame with two extra pawns will give White the winning edge.
Chapter 4: Black's 6th Move Alternatives
Section 1: 6 ... c6 is an interesting move because it is same move that is played in the Nimzowitsch Counter-Gambit. White will be able to maintain a slight advantage in this line.
Section 2: 6 ... Be7 has ideas of castling and checking on h4. The latter idea does not work.
Section 3: 6 ... Bd6 attacks the f4-pawn, but this pawn is already protected by the c1-bishop. Thus, the bigger idea for Black is bringing out the bishop so he can castle.
Section 1: 6 ... c6
7. Bd3 cxd5 8. Bxe4 dxe4 9. Qxd8+ Kxd8 10. Ng5 Ke8 11. Nxe4. This lines leaves White a pawn up and better king. White with a slight advantage going forward.
Section 2: 6 ... Be7
7. Bd3 Qxd5 8. Qe2 Qa5+ 9. c3 Nd6 10. 0-0. Further study needs to be done in this line. At worst, the game is even. At best, White has a slight advantage. Obviously, 7 ... Bh4+?? loses to 8. g3 since both the bishop and knight are being attacked.
Section 3: 6 ... Bd6
7. Bd3 and as we can see this move has become a theme at this point. We are looking to develop and attack at the same time. 7 ... Qe7 8. Qe2 (another common move that White should be looking to be play). 8 ... Nf6 9. Qxe7+ Bxe7 10. c4 0-0 11. Be3 with the idea of preventing Bc5. White has a slight advantage.
Chapter 5: Black's 7th Move Alternatives
Section 1: 7 ... Qxd5? loses tactically to Nfd2.
Section 2: 7 ... 0-0? gives White a strong advantage after Qxe4.
Section 1: 7 ... Qxd5?
8. Nfd2 f5 9. Nc3 Qf7 10. Ndxe4 fxe4 11. Qxe4. White has a complete advantage.
8. Qxe4! Re8 9. Ne5! f6 10. Bd3 g6 11. Nc3 fxe5 12. fxe5 Bf5 13. Qf4 Rf8 14. Qc4. White has a clear advantage given his two extra pawns and domination of the center.
Chapter 6: Black's 8th Move Alternatives
Chapter 7: Black's 9th Move Alternatives
Section 1: 8 ... Bb4?? loses to a simple tactic.
Section 1: 8 ... Bb4??
9. Qb5+ Nd7 10. Qxb4 with no compensation for the lost knight.
Chapter 7: Black's 9th Move Alternatives
Section 1: 9 ... Nxc3 is an important move that is played fairly often.
Section 2: 9 ... Bxe3 is not that much of a problem for White.
Section 1: 9 ... Nxc3
10. Bxc5 Nxe2 11. Bxe7 Nxf4 12. Ba3 and White gets a fine position. If Black takes on c2, White will play Rc1 and capture on c7.
Section 2: 9 ... Bxe3
10. Qxe3 Nxc3 11. Qxe7 Kxe7 12. bxc3 and despite the doubled c-pawns, White is just fine in this position.
Chapter 8: Black's 10th Move Alternatives
Section 1: 10 ... Nexc5? a move that will be played if your opponent gets confused. It gives White a complete advantage.
Section 1: 10 ... Nexc5?
11. Nd4 Qxe2 12. Bxe2 g6 13. g4 Be4 14. 0-0 and White's extra pawn should be decisive for him.
No comments:
Post a Comment