- A repertoire for White covering the first 10 moves of the Classical Variation (3. Nf3 g5 4. h4 g4 5. Ne5).
- Useful for getting started, improving on what you already know, and as a surprise weapon in tournament play.
- Tested with the strongest computer engines (i.e., Stockfish and Rybka).
- Important lines and ideas are explained.
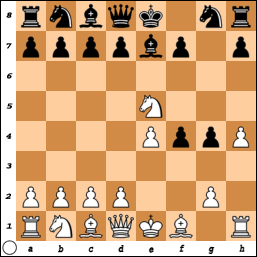
1. e4 e5 2. f4 exf4 3. Nf3 g5 4. h4 g4 5. Ne5 (...)
Let's do a full analysis on this key position. Players with experience in this opening can consider skipping the analysis and start with Part A.
In terms of material:
- Black is up one pawn. However, White is threatening to take the g4 pawn since it is being attacked twice and defended zero times.
- Black's kingside pawn structure (analyzed separately below) leaves him vulnerable to attack which is, of course, the idea behind the King's Gambit.
- White knight is already attacking f7 and there are ideas of bringing the light-squared bishop to c4.
- The White king is only slightly safer (but White has the initiative!)
- One idea to keep in mind is that Black can, at some point, play Be7 and create Bishop + Queen battery to infiltrate White's king by taking on h4.
- If White castles kingside, he needs to be prepared to deal with the move g3 (usually by putting the knight on f3).
- Black's f4 pawn cannot be defended by any other pawn and cannot (and should not) be saved.
- Should Black's g4-pawn come off the board, Black will be left with an isolated h-pawn and doubled isolated f-pawns.
- White's kingside pawns are slightly better than Black's because there is not a real threat that he will be left with both isolated and doubled isolated pawns.
- The g2-pawn is awkwardly placed and the e4-pawn is not defended.
- Black has two developed pawns: g4 and f4. These two pawns can cause trouble for White, but it should also be kept in mind that White is on the attack and there is very little time.
- The Black queen has an open diagonal towards the h4-pawn and the Black bishop has both diagonals open.
- White has a developed knight on e5, but this knight can be attacked in several different ways.
- White also has two developed pawns: e4 and h4.
- The White light-squared bishop has an open diagonal and can be developed on c4.
- The White queen is attacking the g4-square, but taking with the queen would allow Black to play a move like d6 (double attack), attacking both the knight on e5 and the queen on g4.
- Black is threatening to play Be7 and attack the h4-pawn with check.
- Black can take advantage of the e-file and the pin against the White king by playing a move like Qe7.
- White's threats are to mount a powerful attack against the Black king. Certain ideas, like Bc4, can force Black to defend in an awkward manner (e.g., Nh6 in response to Bc4).
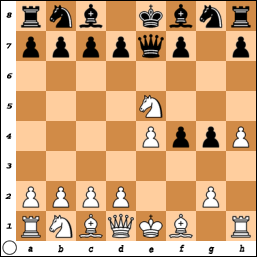
Part A: 5... Bg7
Part B: 5... Be7
Part C: 5... Qe7
Part D: 5... d6
Part E: 5... Nf6
Part A: 5... Bg7
A decent move, but not the best move. With correct play, White can come out of this with an advantage. White chooses between 6. d4 and Nxg4. Although 6. Nxg4?! looks correct, it is not because it leads to Black turning the tables on White as demonstrated by the following line: 6... d5! 7. exd5?? Qe7+ 8. Qf2 Bd4+ 9. Qf3.
Below is our repertoire main line (for 5... Bg7) which we will work with. We will start with the main line in each of the five parts, A through E. From there, we will look at spots where Black can try something different and how White should respond to those moves.
6. d4 d6 7. Nxg4 Bxg4 8. Qxg4 Bxd4 9. Nc3 Nf6 10. Qxf4 Qe7
Section A1: 6... Nf6
Section A2: 6... f5
Section A3: 6... d5
Section A4: 6... Bxe5
Section A1: 6... Nf6
Allows White to take the initiative or have natural development as many lines demonstrate.
6... Nf6 7. Nxg4 Nxg4 (7... Nxe4 is analyzed in Section A11) 8. Qxg4 Bxd4. In this position, it is not so important that White take the f4-pawn immediately. For one thing, a move like Qxf4 can lead to the Black rook taking the g-file. Of course the bishop cannot take that pawn because Black will play Bxb2 and win the a1-rook. 9. Nc3. Here, White is not worried and even welcomes BxN because it opens up the board with White having the bishop pair. 9... d6. Why not play this when it is a free tempo? Here, White has a very interesting move which I am going to recommend realizing how confusing it might look on first look. The move is 10. Qf3!. I gave this move an exclamation mark because of the idea behind it. White is defending the knight on c3 so that if Black captures, White can avoid doubling his c-pawns. It is not like Black can defend his f4-pawn successfully. 10... Rg8. Black takes the g-file.
In this position, White's plan is to try and target the f7-pawn. Black can delay this by taking on c3 but, again, that will leave White with two bishops (and this time White will not double his c-pawns). White will probably delay playing Bc4 and continue with 11. Bxf4 in order to avoid his queen being kicked from the 3rd rank.
An important side variation of the above repertoire line we will look at is 7... Nxe4. The reason this line is important is because that you may encounter it more than NxN since it takes material instead of exchanging material. White must decide between Nc3 and Bxf4. 8. Bxf4 is the move I would recommend. Here, if Black plays anything other than 0-0, White will have a slight advantage with moves like Nc3 and Ne3 (if Qe7) in mind. After 8... 0-0, White should play 9. Nc3 and if Black takes he will be giving up one of the two developed pieces (not counting his king and rook) and a piece which he moved several times for knight that only moved once. 9... Re8 is the only move that arguably does not give White a small but clear edge. 10. Ne3 is the best reply and Black will respond with 10... Ng3.
6... f6 7. Nc3! fxe5 8. Nd5. Threatening Nxc7+ and the queen on e7. If Black plays 8... Qd8, White plays 9. Qxg4 d6 10. Qh5+ Kd7 11. dxe5 and since White has a ton of initiative, Black will try and trade with 11... Qe8 12. Qxe8+ Kxe8 13. Nxc7+. White gets a rook and 2 pawns for the knight. White is clearly winning, it is all technique from here on out. 8... Qd6 9. dxe5 Qxe5 10. Bxf4 Qxe4+. Game will go on 11. Qe2 Qxe2+ 12. Bxe2 Bd6 13. Bxd6 cxd6 14. Nc7+ Kd8 15. Nxa8+ b6 16. 0-0 Ne7 with an advantage for White.
6... Nf6 7. Nxg4 Nxg4 (7... Nxe4 is analyzed in Section A11) 8. Qxg4 Bxd4. In this position, it is not so important that White take the f4-pawn immediately. For one thing, a move like Qxf4 can lead to the Black rook taking the g-file. Of course the bishop cannot take that pawn because Black will play Bxb2 and win the a1-rook. 9. Nc3. Here, White is not worried and even welcomes BxN because it opens up the board with White having the bishop pair. 9... d6. Why not play this when it is a free tempo? Here, White has a very interesting move which I am going to recommend realizing how confusing it might look on first look. The move is 10. Qf3!. I gave this move an exclamation mark because of the idea behind it. White is defending the knight on c3 so that if Black captures, White can avoid doubling his c-pawns. It is not like Black can defend his f4-pawn successfully. 10... Rg8. Black takes the g-file.
In this position, White's plan is to try and target the f7-pawn. Black can delay this by taking on c3 but, again, that will leave White with two bishops (and this time White will not double his c-pawns). White will probably delay playing Bc4 and continue with 11. Bxf4 in order to avoid his queen being kicked from the 3rd rank.
Section A11
An important side variation of the above repertoire line we will look at is 7... Nxe4. The reason this line is important is because that you may encounter it more than NxN since it takes material instead of exchanging material. White must decide between Nc3 and Bxf4. 8. Bxf4 is the move I would recommend. Here, if Black plays anything other than 0-0, White will have a slight advantage with moves like Nc3 and Ne3 (if Qe7) in mind. After 8... 0-0, White should play 9. Nc3 and if Black takes he will be giving up one of the two developed pieces (not counting his king and rook) and a piece which he moved several times for knight that only moved once. 9... Re8 is the only move that arguably does not give White a small but clear edge. 10. Ne3 is the best reply and Black will respond with 10... Ng3.
After White plays Rh3, he will have good initiative. Think of the position this way: If White manages to castle queenside, he will have a safe king and the Black king will be an easy target. What all this means is that Black has to respond with NxB. White will not mind giving up his h-pawn: 12... d6 13. Rg3 Qxh4 14. Qf3 with a clear advantage for White since his pieces are super active and eyeing the Black king. Moves like Bg5 will be a little annoying for Black.
Section A2: 6... f5?!
Rare and strange. This move does defend g5 since it is better for Black that White take the f-pawn rather than the g-pawn--taking the g-pawn will leave Black with neither doubled nor isolated pawns. The two most important points for this position: (1) White can get a clear initiative and advantage with correct play and (2) White should not get greedy and try to collect as many pawns as possible.
6... f5?! 7. Bc4. In the spirit of the King's Gambit, White chooses initiative over collecting pawns. 7... Nf6 is the best reply and it still arguably gives White a clear advantage. 8. Nc3 Nxe4 9. Nxe4 d5 10. Nc3 dxc4. In this position, White must play Qe2. The White queen is threatening a discovered check and taking on c4 will be with check if Black castles.
Section A3: 6... d5
Black opens up the diagonal for the light-squared bishop and attacks the e4-pawn.
6... d5 7. Bxf4 Nf6 8. Nc3. Should Black decide to play exd4, the juicy c4-square will be open to the light-squared bishop. Perhaps even exd5 will do the same job. 8... 0-0 is the best move. 9. Qd2, one idea being the castling to the queenside which would make the White king very safe. 9... Nxe4 10. Nxe4 dxe4. White will castle queenside either immediately or after first playing Qe3 or Bc4.
Section A4: 6... Bxe5??
Just to cover more bases, we will quickly look at this blunder move.
6... Bxe5 7. dxe5. Black gives up the bishop pair in an open game. Also, both pawns are attacked and White has everything ready to comeout: queen, both bishops, and the knight. We will look at two attempts here: (1) 7... f3 and (2) 7... Nc6.
(1) 7... f3 8. Nc3 (Note: 8. Bg5 is also winning) 8... Nc6 9. Bg5 Nce7 (9... Nge7 10. Nd5 and if Black does nothing, White is threatening Nf6 check and then Bh6 checkmate). The g8-knight controls the f6-square and, thus, Black chooses to move the other knight. 10. Nd5 0-0 and after a move like Qd2, White is ready to make the game 1-0. White is looking to play moves like Bf6 (very important idea) and then Qg5--a simple idea that is very difficult or impossible to stop.
(2) 7... Nc6 8. Bxf4 f6 9. Qxg4 threatening Qg7. 9... Qe7 preventing Qg7. 10. Nc3 fxe5 and White should be able to force a queen trade which will be to his benefit since the board is open and he he has the bishop pair.
Part B: 5... Be7
Black wants that h4-pawn and, to add insult to injury, capturing is with check. White can defend by Qxg4 but that leads to draws.
6. Bc4! Nh6 7. d4 d6 8. Nd3 Bxh4+ 9. Kf1 Nc6 10. Bxf4 Ng8.
Section B1: 6... Bxh4?
Section B2: 6... d5?
Section B3: 6... f3?
Section B4: 7... Bxh4+
Section B5: 8... f3
Section B6: 9... g3
Section B7: 10. Na5
Section B1: 6... Bxh4?
6... Bxh4? 7. Kf1 Nh6 8. Nxg4 Nxg4 9. Qxg4 threatening the bishop on h4. 9... Bf6 (if 9... d5, then 10. Bb5+ c6 11. Qxh4 Qxh4 12. Rxh4 cxb5 13. exd5. White will go on to take the f4-pawn and promote the passed d5-pawn in the endgame). 10. Qxf4 Qe7. White will play Nc3 and if Black trades the bishop for knight, it will be two bishops versus bishop and knight on an open board. White will have the winning advantage.
Section B2: 6... d5?
A common move in the King's Gambit, only it is not so good here.
6... d5? 7. Bxd5 Nh6 8. d4 c6 9. Bb3 Bxh4+ 10. Kf1 Bg5.
Generally, White's pieces are better placed. The following lines leads to tripled pawns and a clear advantage for White: 11. Nc3 f6 12. Nd3 Qxd4 13. g3 fxg3 14. Rxh6 Na6 15. Bxg5 fxg5.
Section B3: 6... f3?
6... f3? 7. gxf3 Bxh4+ 8. Kf1 Nh6 9. d4. The knight on h6 is attacked. 9... d6 10. Nd3 Bg5. After the exchange of bishops, White should play Qd2 which forces a queen exchange since the knight on h6 is threatened. Black will be forced to play the horrible looking Ng8 at that point.
Section B4: 7... Bxh4+
7... Bxh4+ 8. Kf1 d6 9. Nd3 g3 10. Nd2 with the idea of putting the knight on f3 and creating safety for his king. 10... Ng4. The d3-knight is protecting the f2-square and the f3-knight is protecting the h2-square.
Section B5: 8... f3
A move that opens the White dark-squared bishop attack on h6. White should not fall for the bait and hand Black the initiative.
8... f3 9. gxf3. The position looks messy, but White will walk away from this mess with a solid advantage because now one of the only ways to protect the h6-knight is to play the ugly Ng8 move. At that point, we can play 10. fxg4 and have a very solid position. Let's see what happens if Black tries something else. 9... Bxh4+ 10. Kf1 Bg5 and the extent to which the h6-knight is badly placed becomes evident. Here, I like the move f4 and, after Black plays Bh4 (and awkward way to protect that knight), I would play f5 to renew the attack on the knight. This can get tricky it is important to be aware of defenses (should Black sacrifice his knight on f5) such as Nf4. Also, it is important to be aware of counter-attack tactics such as Nd5 if the queen moves to squares like f6.
Section B6: 9... g3
A move with vague ideas of playing Nf2 or making something happen with the move f3. Although all of that seems it will not work, g3 move has to be dealt with carefully and the first move in response should be Nd2 to occupy the f3-square.
9... g3 10. Nd2 Bg5. The following moves are instructive 11. Nf3 Ng4 12. Qe1 to protect e4, get out of the possible fork, and further protect the e3-square, and attacks the f3-pawn which is relevant should the f4-pawn come off the board.
Section B7: 10. Na5
A move that counter-attacks the c4-bishop while the h6-knight is under attack--Black really does not want to play the passive and ugly Ng8. After 10... Na5, I would recommend messing up Black's structure future: 11. Bb5+ c6 12. Bxh6 cxb5 13. Nc3 and if Black plays something like a6, play 14. Nf4 with the idea of occupying the d5-outpost.
Part C: 5... Qe7
Looks strong, but leads to a specific line that can easily be familiarized with.
6. d4 d6 7. Nxg4 Qxe4+ 8. Qe2 Qe7! 9. Qxe7+ Bxe7 10. Nf2 Nc6.
Section C1: 6... Nf6
Section C2: 6... f6
Section C3: 6... Nxe7
Section C1: 6... Nf6
6... Nf6 7. Bc4 d6 8. Bxf7+ (not Nxf7) 8... Kd8 9. Bb3 dxe5 10. dxe5 Nbd7. White will go on to play Bxf4 (slightly better than exf6) with the threat to play e6 at some point and win that knight instead of the f6 one.
Section C2: 6... f6
Not exactly sure why someone would play this move over d6 which opens up lines for the bishop. This move even takes the knight's f6 square. But the point is to break open the e-file and it does accomplish that goal. But White has a bold and crazy idea that will shock your opponent: 7. Nc3!.
6... f6 7. Nc3! fxe5 8. Nd5. Threatening Nxc7+ and the queen on e7. If Black plays 8... Qd8, White plays 9. Qxg4 d6 10. Qh5+ Kd7 11. dxe5 and since White has a ton of initiative, Black will try and trade with 11... Qe8 12. Qxe8+ Kxe8 13. Nxc7+. White gets a rook and 2 pawns for the knight. White is clearly winning, it is all technique from here on out. 8... Qd6 9. dxe5 Qxe5 10. Bxf4 Qxe4+. Game will go on 11. Qe2 Qxe2+ 12. Bxe2 Bd6 13. Bxd6 cxd6 14. Nc7+ Kd8 15. Nxa8+ b6 16. 0-0 Ne7 with an advantage for White.
Section C3: 6... Nxe7
Black is saying he is intending to develop the bishop on g7.
10. Nf6+ Kd8 and White will go on to develop and mount an attack on the uncastled king.
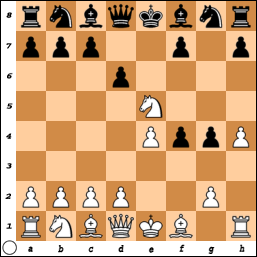
Part D: 5... d6
This is a move that can lead to many draws.
6. Nxg4 Nf6 7. Nxf6+ Qxf6 8. Nc3 Nc6 and White is left with a tough decision on what move to make with no absolutely clear idea what is best. Here, I recommend 9. Nd5 Qg6 10. d3 Qg2+. Although it looks bad for White, it is not as bad as it looks. White is threatening the rook on a8 with a king and rook fork on c7. Also, White's king will have plenty of escape squares on the queenside. Additionally, White can force (i.e., Qf3) Black to trade queen or retreat his queen.
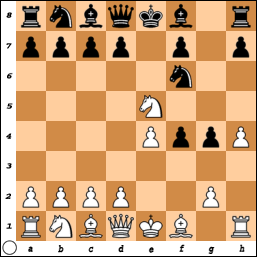
Part E: 5... Nf6
6. Bc4 d5 7. exd5 Bd6 8. d4 0-0 9. Bxf4 Nh5 10. g3 f6.
Section E1: 7... Bg7
Section E2: 8... Nh5
Section E1: 7... Bg7
7... Bg7 8. d4 Nh5 9. 0-0 Qxh4 10. Qe1 Qxh4. Black has to trade queens or concede a clear advantage to White. Now White's king is safe and he can move on to develop his last three pieces.
Section E2: 8... Nh5
8... Nh5 9. 0-0 Qxh4 10. Qe1 Qxe1. Again, if Black does not exchange White will get the advantage.
No comments:
Post a Comment